A composite sign, not a one-line emblem
The familiar Monad stacks a lunar crescent above a solar circle and point, a right-angled cross, and a horned form associated with Aries. Dee does not assign that pile of shapes one stable sentence. Across twenty-four theorems he repeatedly separates, counts, turns, and recombines its parts. The same stroke can be read geometrically as a line, astronomically as part of a planetary character, numerically as a unit in a ternary or quaternary, and alchemically as part of an operation of separation and conjunction.
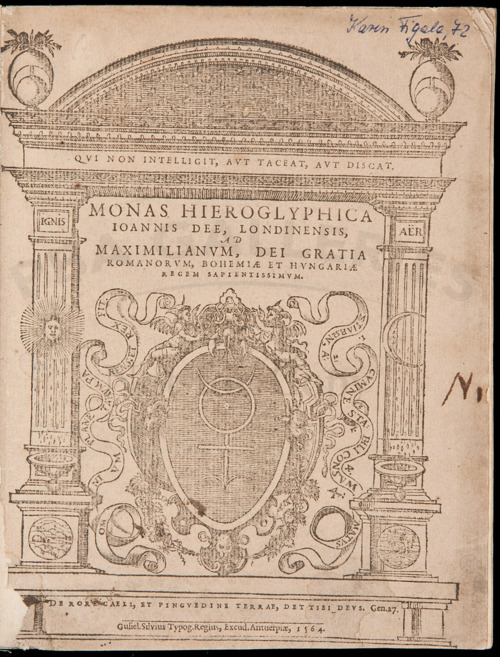
The 1564 title page displays the completed emblem before the theorem sequence explains it. That difference between visual preview and argumentative order is essential. A cropped reproduction gives every component at once; the text withholds their relations and introduces them in stages. The early leaves begin with point, line, circle, Sun, and Moon. The cross receives its first extended interpretation in theorem VI, the Aries form in theorem X, and the planetary characters in theorems XII and XIII.
The distinction between component and completed emblem also guards against anachronism within the book itself. The point and circle have a defined role before the elemental cross is counted; the cross is counted before the Aries form introduces fire; and only later are familiar planetary signs anatomized as combinations of those pieces. Dee’s claim depends on this order of derivation. If every component is assigned its later meaning at the first glance, the reader loses the demonstration by which the text tries to make one graphic vocabulary generate many signs.
How the twenty-four theorems transform the figure
The first movement builds a celestial diagram from elementary geometry. A later movement makes the cross carry the elements and several numerical structures. Dee then dissects conventional planetary signs into the same lunar, solar, elemental, and Aries-like components. In the later theorems, alphabetic values, an alchemical egg, rearranged planetary parts, vessel shapes, and a measured construction all emerge from the one figure. The book’s method is generative: the emblem is useful because it can be taken apart and made to organize several kinds of knowledge.
This also explains why the Monad should be kept distinct from Dee’s later angelic materials. Nothing in the early construction turns the glyph into the Sigillum Dei Aemeth, a Watchtower, or an Angelical letter. The 1564 book’s own sequence is already complex enough. Its diagrams move between geometry, astronomy, number, and alchemy within a printed philosophical argument; the later wax objects and spirit diaries have separate forms, dates, and documentary settings.
The diagrams therefore function like successive states of an argument. Some isolate a component, others rotate or divide it, and theorem XXIII finally gives proportional directions for constructing the whole. The finished outline remains recognizable, but its internal relationships change as Dee moves from celestial observation to elemental number and alchemical transformation. The symbol’s unity is produced by carrying the same limited set of marks through these different operations, not by attaching an independent keyword to every part.
Worked reading: Theorems I–IV build the Monad from point, circle, and cross
The heading names the full figure, but the step-by-step reading reveals an important limit: the cross is visible in the completed Monad yet Theorems I–IV do not interpret it. Theorem I begins with straight line and circle as the simplest means of bringing hidden or nonexistent things into representation. Theorem II places the point beneath both forms: a line depends on a point, a circle depends on a line, and even the widest circumference depends on its center. Dee has moved from marks on a page to a claim about origin and support.
Theorem III converts that geometry into cosmology. The central point becomes Earth, the visible centered circle becomes the Sun, and the surrounding planetary paths are imagined around it. Theorem IV adds the lunar semicircle above the solar circle. Vertical placement might suggest superiority, but Dee explicitly reverses that easy reading: the Moon receives and reflects solar light. The crescent represents dependence, disappearance, and return rather than simple rank. By the end of IV, point, solar circle, and lunar horn have acquired a hierarchy; the elemental cross still waits for theorem VI. That delayed explanation shows how Dee builds meaning through sequence instead of treating every visible stroke as a ready-made symbol.
The cross enters two theorems later as another controlled addition. Theorem VI sets the Sun and Moon on two perpendicular lines and counts their common center as part of a ternary, then counts four radiating segments and four right angles to expose a quaternary and an octad. Theorem VII assigns the four contrary directions an elemental role. This sequence confirms what I–IV have prepared: the point is not decorative, because it lets one set of intersecting strokes be read as joined lines, a center, and a source of numerical relations.
Source records
- Wellcome Collection, digitized 1564 copy ↗
- Wellcome Collection, 1564 Monas hieroglyphica catalogue and Public Domain Mark ↗
- Salisbury Cathedral Library, 1564 copy B14419 ↗
- The twenty-four theorems in English, keyed to Dee’s diagrams ↗
- Wikimedia Commons, public-domain 1564 title page ↗
- WitchcraftDaily, Sigillum Dei Aemeth and surviving wax discs